Get More out of Portfolio Reports: How to Add Portfolio History
 Printer Friendly
Please note Portfolio History is a Premium Plan only feature.
A key advantage of Stock Rover’s Portfolio Analysis facility is its ability to track the value of your portfolios over time. While these analytics are helpful in many contexts, they become acutely powerful when using an accurate trading history.
This blog post will explain how to create portfolio history in Stock Rover. This feature is always evolving so even if you’ve used it before, there may be some changes you haven’t seen.
Later this year, paid subscribers will have the option to link their brokerage accounts directly to Stock Rover, so that trades are updated automatically. Until then, users must update portfolios manually as described below.
Contents
Understanding Portfolio History in Stock Rover
The key thing to understand is that portfolio management in Stock Rover is “position based,” meaning that portfolio history consists of snapshots, called date records, of your portfolio over time. You can enter trades, but the transactions themselves are not recorded in Stock Rover. Rather, your positions are updated according to the trades you have entered, so that if you look at your portfolio at any given time, you will see everything you owned on that date and in what quantities.
Date Records
Let’s work with a sample portfolio called Credit Services. This portfolio was initiated at the beginning of January 2010. You can see below in the Create Portfolio window that I’ve selected 01/01/10 as the date and filled in quantities and buy prices for three securities, MasterCard (MA), Visa (V), and American Express (AXP), plus I’ve added $8K of cash.

This will create a date record for 01/01/10. A date record is simply a record of a portfolio’s positions on a given date (as they differ from previous dates). Date records are the data points that make up your portfolio history.
For dates that do not have a date record, Stock Rover assumes the same holdings as the previous date record. Note that the details of day trades or trades which are bought and sold between position updates are not captured. However the profit or loss that accrues from such trades will be seen as an inflow (or negative inflow, in the case of a loss) in the Portfolio Reporting facility.
Also note that when importing a portfolio you can assign a date, which creates a date record for the imported positions (the default date will be the current day or the most recent trading day).
Before I can add any other date records, I must click ‘Create’ to create the portfolio. There are now several ways to update this portfolio so that it includes a full trading history. Let’s go over the options.
Trade In Portfolio
One easy way to add history is to record a trade right from the Table. To do this, right-click on the row of the stock you want to update and select ‘Trade in Portfolio’ from the menu.
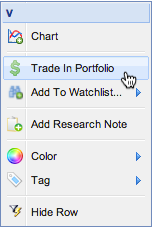
This option is available for any stock, regardless of what dataset you have loaded in Table.
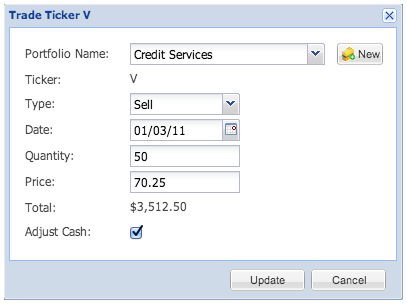
Selecting ‘Trade in Portfolio’ opens up the following dialog, where I can select which portfolio I want to update, whether I bought or sold the stock, on which date, by how many shares, and for what price. I can also opt to have my cash adjusted automatically once this transaction is entered. As you can see below, I sold 50 shares of Visa on January 3, 2011 for $70.25 apiece.
Note that this ‘Trade in Portfolio’ operation is also available when you select multiple rows in the Table, allowing you to sell or buy multiple stocks en masse (with some limitations). This is useful if you’ve sold off multiple stocks on the same day, or if you want to create a virtual portfolio, described later in this post.
Portfolio Manager
Another way to add portfolio history is through the portfolio manager, which you can access by right-clicking your portfolio in the Navigation panel and selecting ‘Modify’ or clicking ‘Modify Portfolio’ in the Task Wizard.
In the portfolio manager below, notice that my Credit Services portfolio now contains two date records, one for the initiation date, 01/01/10, and one for 01/03/11, when I sold 50 shares of Visa. I can click on one of those dates and it will show me how my portfolio looked as of that date.

Once I open one of these date records, notice that I have the option to ‘Manage this date.’

If I click on that link, it opens the following dialog, allowing me to delete the record all together, change the date of the record, or copy the positions to another date (thus creating a new date record).

Since I don’t need any of these options right now, I’ll just hit ‘Cancel.’
Back in the portfolio manager, I select a new date, January 3, 2012, which automatically displays the positions of the most recent date record (01/03/11). As shown below, I add a new holding, Capital One Financial (COF), of which I purchased 125 shares for $43.75 on this date. Now that I’ve made a change to my positions, 01/03/12 will get added as a new date record whenever I click ‘Update.’

Sell Prices
Let’s say I also sold 50 shares of AXP that same day, 01/03/12, for $48.50. To record this accurately from the portfolio manager, I create another line for AXP, with a negative quantity of 50 and a cost per share of $48.50. This is shown in the red box below.

Doing this allows Stock Rover to incorporate the correct sell price into my portfolio. If I were to simply reduce the number of shares on the original AXP line from 100 to 50, it would assume I sold those 50 shares for the closing price on that day.
(By the way, negative quantities can also be used to indicate short positions in your portfolio.)
When I click ‘Update’ the AXP rows will be merged (a dialog will ask me to OK this), reflecting the partial sale of the lot. You can see the results below—AXP’s quantity is now 50 and its buy price is now $32.54. The new buy price comes from (-50*48.50) + (100*40.52), divided by 50 remaining shares.

If you don’t like the negative quantities method, you can always stick with the ‘Trade in Portfolio’ option described above. That is the most straightforward way to sell something in Stock Rover. However, the negative quantity method allows you to accurately record a sale from the portfolio manager if you are already working in that window.
Update Quantities in the Table
If you want to record changes from today (or the most recent trading day) to an existing portfolio, you can do so easily from the Table. Simply load that portfolio in the Table and open your Portfolio Performance View tab or any View that contains the Quantity and Buy Price columns. When you hover over these columns, you’ll see that the cells become editable, shown below.
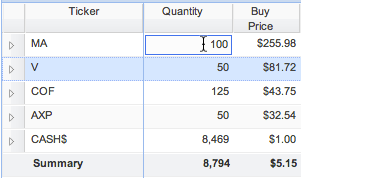
If I were to change any of these values, a new date record would be created for the current day (or most recent trading day) reflecting the changes I’ve made.
Multiple Lots
It’s common to purchase shares of a stock on one date, and then purchase more shares on a different date for a different price. How does Stock Rover handle this?
Just as when you enter a sale in the portfolio manager using a negative quantity, Stock Rover combines the multiple lots and uses a weighted average of the buy prices, creating a single lot. So you can enter multiple purchases of the same stock, but they will ultimately appear as only one line in your portfolio in Stock Rover.
For example, I decide to buy another 25 shares of Visa on January 2, 2013. In the portfolio manager below, you can see that I’ve added another line of Visa to record this purchase.

Now watch what happens when I click update.

I click ‘OK’ and…
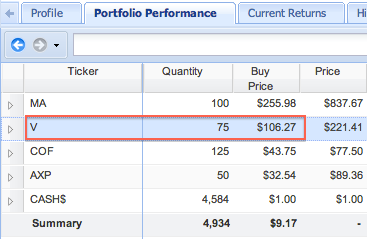
As you can see in the Table screenshot above, Visa is now represented in my portfolio as having a buy price of $106.27 for 75 shares. That is (25*155.38) + (50*81.72) divided by 75.
The advantage of the single lot system is that it is much simpler than a multiple lot system, it can be processed faster, and you still get an accurate representation of your portfolio’s performance when running portfolio analytics.
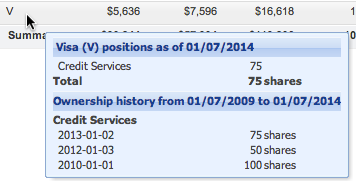
The disadvantage is that you can’t see the individual buys and sells or their prices. For those details you’ll still need to rely on your brokerage account. However, in the Holdings Detail tab of the Portfolio Reporting window, you can see a tooltip that shows a history of the position change over time, as shown below.
Virtual Portfolios
Finally, there’s one other task I want to demonstrate using the features we’ve discussed in this post: creating a virtual portfolio. A virtual portfolio contains holdings you don’t necessarily own in real life, and it can be a useful tool for testing investment ideas.
With virtual portfolios, allocation tends to be more important than the precise share quantities you assign. Stock Rover makes it a snap to create a virtual portfolio with a simple allocation scheme using the ‘Trade in Portfolio’ operation.
In the Table, I select multiple stocks that I want to have equal allocation in my virtual portfolio (to select multiple rows, hold down the shift or control/command key), I right-click them and select ‘Trade in Portfolio’ from the drop-down menu. In the form that opens, I click on the button to create a new portfolio, pointed out below.
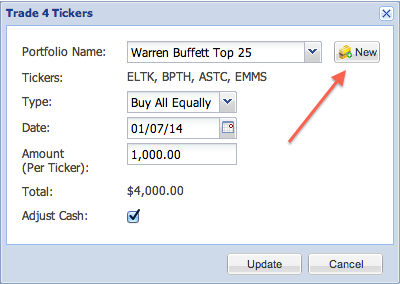
From there, I give it a name, My Virtual Portfolio, and choose ‘Buy all equally’ from the drop-down menu. I can then say how much virtual money I want to use for each stock. To keep it simple, I’ll say $1000.00 for each stock.

After clicking ‘Create,’ my portfolio is then established with an equal allocation among all stocks. I can then use the nice round number of $1000 as a unit to create the allocation I want in the portfolio as I add stocks to it. For example, I could grab another group of four stocks and add them to this portfolio with $2000 spent on each ticker. This would mean this second batch of four stocks would make up two-thirds of the total portfolio, while the original four would make up one-third.
After setting up a virtual portfolio, you can of course adjust it however you wish from there. What’s nice about the ‘Buy all equally’ option is it makes it very quick to set up the foundation of your virtual portfolio.
Conclusion
So now you have seen there are several avenues to create portfolio history:
- Through the portfolio manager window
- Using the ‘Trade in Portfolio’ drop-down menu option in the Table
- By directly editing quantities and buy prices in the Table (to record trades on current or most recent trading day only)
You have also seen how Stock Rover combines multiple lots and takes negative quantities into account, as well as how the ‘Trade in Portfolio’ operation can help you set up a virtual portfolio.
Each time you make a change to your portfolio, Stock Rover keeps track of it as a date record, and then connects the dots between date records, allowing you to see accurate analytics over any given period of time in both the Chart and Portfolio Reporting window.
For more on these features, watch our In-Depth Portfolio Analytics webinar or see our How To pages.
We realize that for day traders or very active traders, Stock Rover’s position-based system is unlikely to afford perfectly accurate portfolio records (brokerage linking will eventually solve this problem). Thus we continue to expand and improve our portfolio management features to make them as nimble and practical as possible. Please feel free to write in with feedback on your experience with our portfolio management capabilities.
Comments
Comments are closed.
Top
I’m confused. for give me, but i’m reading the tutorial and seeing the screen shots, them go to the program and just can’t see the same screen shot that is in the tutorials. thanks for your help
This blog post was written when Stock Rover 6.4 was the most recent version. The new version, 7.0 is quite a bit different.